That's right, we have our own holiday!!! Just for us to create and be scrapbookers! I plan to be BAD that day... I'm taking the day off as cook, server, or any other house duty! Join me on Saturday, May 2nd from 12-12 EST (9am-9pm PST)as we at Bad Girls Kits offer amazing classes and challenges to keep you busy all day long!!! It will be a fabulous day!!!
I am a BAD blogger... well, only in that I'm late in posting a winner for the "green" RAK... so sorry about that.. I just forgot to pick a winner... so, here is the winner of the recycled goodies: Gina said...Love these effects..can't wait to have a play!! "D
Gina, email me! I'll get those right out to you! Here's today's tutorial. Another photo transfer technique. It's using an inkjet printer image and some gel medium. I use the matte finish kind, but you can certainly use gloss medium. So gather your supplies and create a distressed image transfer on something!
I'm using a shipping tag for this demo, but you can use any flat surface that has been primed. My image was created with an inkjet printer and is black and white. You can also use color images from an ink jet. I suggest something with strong outlines and high contrast for the best results. Step 1: brush a good coating of medium onto your surface with a foam brush. This will limit the brushstrokes shown, but if you like brushstrokes, use a bristle brush. BOth looks are different and distressed. Don't let this dry! Step 2: place image face down onto medium and burnish with tool or spoon. Lift corner to see if the image is transfering but don't take too long for this step... it will dry and with it, the paper will stick together. This takes a bit of timing and practice to get it right but I like the "mistakes" too of areas untransfered or distressed look that could create a very moody piece! Step 3: Carefull peel away the image.. I suggest pulling so that the paper is flat against itself thereby revealing your image! Viola! It's a very cool technique and one that I love to use on wood, ceramics, papers, cardboard and other surfaces. Here are a couple pages that I used this technique on:
"Blackbirds"
"Nesting" and "Detail of Nest on tag"
I hope you enjoyed the tutorial and another way to add images to your artwork! If so, add a comment and you will be included in a chance to win a RAK of goodies... including: tags, a small bottle of medium, and some a pack of chipboard shapes. I'll get a photo up soon of it!
Here's the winner from last week's comments: Haberdawoman said...
Cool demo, are you sure you are not Spanish? LOL We talk a lot with our hands :) Just wanted to stop by and say thank you for your sweet comment on my layout. Have a wonderful week.
Nope, not Spanish, but I do like to talk with my hands alot! I will get your RAK out as soon as you email me your addy! Thanks!!!
I am going to try the video thing again next week... hopefully, I won't hate how I look on there and you can see my face. LOL! Next week is a demo using the Cuttlebug and a cool printing technique.
It's that time again... Bad Girls kit peeks! I completely fell in love with this kit... it's full of charm, rich colors, and romance! Just up my alley with texture and patterns aplenty. Okay, enough of my teasing.. here are some peeks at what I created:
Join the Bad Girls Design Team for a reveal night chat and fun on April 30th at 12pm EST. Hope to see and chat with you there!!!
I'm going to try something different for this week's demo... video! Be nice, this is my first time and I know I have lots to improve on. This will be the first of 3 image transfer demos... so without further ado...
Okay, first of all, I really didn't like how I looked today so you are only seeing my hands. I noticed a few things about my hands... one, I talk alot with them. They are constantly moving. Which is okay, if they aren't blocking what you need to see in the video. Second, I need a tripod... seriously, I thought I had a tabletop one, but well, I can't find it. Either I'm imagining that I had one or it walked away and is hiding in the depths of my basement. So, hopefully, I'll get one soon and have my hair done and all prettied up for you all to see me for the next video demo.. not sure it will be next week, but we'll see. Hope you enjoyed this demo and will leave a comment for a chance to win that little RAK... Until next time, have a great night!
Serendipity is the effect by which one accidentally discovers something fortunate, especially while looking for something else entirely.
That explains what happened to me last night while bored and waiting for hubby to get home from a long drive from Cleveland. I had two tabs open on Foxfire and was cruising Facebook and Google at the same time. See, I multi task... Anyways, I was looking for mixed media artwork, which I often do when I need inspiration or just get my juices flowing creatively, AND people that I went to school with. I found 3 people that I have lost touch with and can't believe I found... Steve, whom I worked with on Fredonia's radio station and had a little thing with but were much better friends than the other; Greg, who I had a crush on in high school and he left to go to Cali and join the air force. He had made me a mixed tape that I practically wore out; and Brandin, who I was friend's with from nursery school until middle school and then we found seperate groups to hang with but she was always a sweetheart and stayed nice to everyone. There are many coincidences here... Greg is back in Syracuse and is married. I have chatted a bit with him online and he can't believe that I still have that mixed tape... it was darn good! He had good taste in music and humor. Brandin co-owns Webster's Pages! I was floored when I found this out! She is in the scrap industry AND the art world. She was always artistic and classy. We had alot in common, just not our circle of friends. I am so happy for her success and she has gorgeous kids besides. She looks like I remember her and is a classic beauty. I'm not surprised that she has done so well! My point here?? Well, I wasn't expecting to find these past friends, but on my hunt for something else, I found them! Cool huh? Okay, here are a few other things I found that I LOVE but were not actually looking for them:
Joe's work is breathtaking! I am in awe of his sculptures made of found metal objects that take the form of birds and nature. It is a delicate and sweaty process of piecing, welding, and collecting. I love that! I am in love with this piece. I can't even imagine how long it took to make and if I could afford it, I would buy it and lovingly look at it everyday. I think I may just visit his site daily so I can sigh and oooohhh over it all. I think I may have to save up to get one eventually! It makes me so happy!
This is another example of gorgeous artwork that just makes me swoon. Her use of fibers and fabrics to make the nests makes me want to touch them. They just beckon to be adored. I have such an obsession for nests and birds and when I find one that makes my heart soar, well, it's just something I can't put into words. These do... they are beautiful and precious.
Lee Gainer
Lee Gainer 's artwork , "Popsicle", is made of papertowel rolls, fabrics, papers, and other found objects with lots of color and energy, I love it! I want to make my own version.. This artist has inspired me! I love the earthiness to this and the clean graphic appeal too. It's just amazing! She has an Etsy shop that has some fabulously "green" works of art. She uses mostly all found objects and fabrics that are rolled and adhered... brilliant!!
I hope that I have inspired you to go find your serendipity today... sometimes just browsing, while it seems like a waste of time, is really just opening yourself up to ideas and found inspiration!!!
Okay, I know I know... I'm late. I got back from vacation and just got caught up with unpacking, laundry, emails, and such! So, this is a day late!!! Here's this week's tutorial. It's a favorite technique of mine but not new (maybe it will be NEW-TO-YOU)- Stamping with found objects:
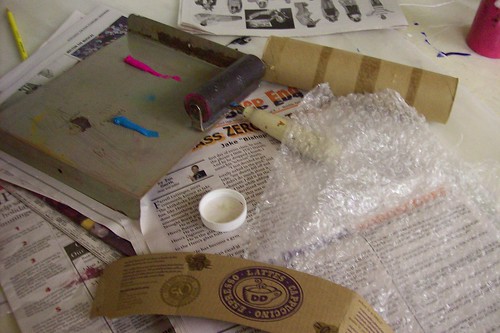
Gather some recycled items such as: paper towel rolls, bubble wrap, caps, corrugated cardboard, and plastic wrap... anything with texture, really. I used Speedball watersoluable inks for this but regular paint works great and a variety of paint types provide a multitude of outcomes.
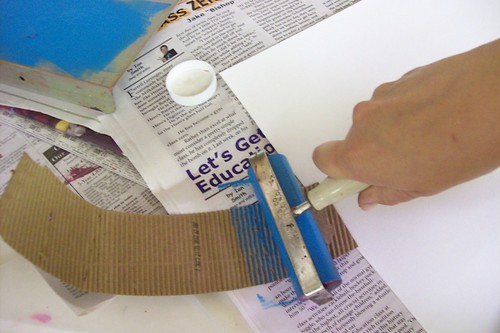
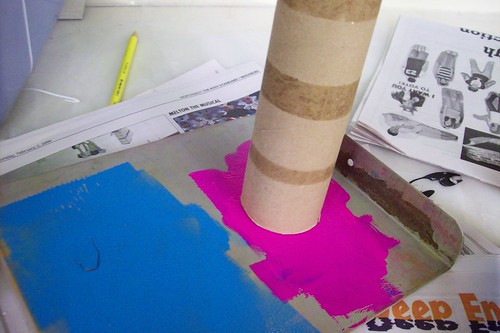
Squeeze some paint or ink onto an inking plate or other type of surface and use a brayer (or a paint brush OR your own fingers if you don't mind getting down and dirty!) to spread the paint onto the item to be stamped. Press the item onto your paper or surface with a firm and even pressure... don't wait too long for the ink or paint to dry or it won't work. Repeat as needed or to create different distressed effects. Another way to use items is to just dab them directly onto the paint or ink and stamp with them to create shapes. Like with this towel roll, I just dab and stamp to create circles. Here is a visual journal page that I did recently with my "green/recycled items". I used bubble wrap and left over packaging from an overlay to create the bird. Here is an older layout I did a few years back and still love the effect that the cardboard makes (lines) and the bubble wrap (circles or dots). This one I actually used recycled materials for the entire page... wrapping paper, Starbucks bag and coffee holder, mailbox letters, cardboard boxes, and bits of drywall tape.So have fun with recycled materials and stamping to create texture and shapes on your artwork. This week I have a little RAK of recycled goodness from my stash. Old song sheets, bubblewrap, drywall tape, cardboard coffee holder, and some samples of paint to try this technique with (not pictured)!! Leave a comment on this post by midnight (EST) on Wednesday, April 22nd and I will pick one winner!! BTW... the winner of the last technique RAK of Prima goodness is: True Random Number Generator1 Congrats
gleestormont!
Email me(mmatott@twcny.rr.com) your addy and I'll get that right out to you! Happy creating!!
If you aren't familiar with Bad Girls kit club you should check it out!! They have a great mix of products available in the kits each month. This month it's called "Butterfly Kisses" and features new magenta HamblyWings overlay. We are also doing a giveaway for one of the Bad Girls April Kits, pictured below!! Here's what you need to do: 1. You have to go and visit the Bad Girls blogand leave a comment there. 2. Plus you need to leave a comment on the Hambly blog as well. Make sure you leave your comments at both places....we will be checking both BLOGS!!!!
You have until Thursday, April 16th, 2009 to enter this drawing.....Good Luck!!!! Winners name will be posted on the Hambly blog and theBad Girls blog, so make sure you keep checking back starting on Friday!!!
I promised a tutorial each Thursday! This week is another metal technique. I am all about the metal look lately! I love it on paper, cardboard, Grungeboard, altered items, well just about anywhere!!! It's elegant, shiny, and grunge all in one little package. This is what you need:
* Gold Leafing( I get mine at an art supply store, but more and more craft stores are stocking the imitation kind for alot less!)... it comes in gold, variegated red, green, black, or some other combo, and even copper or silver. * Adhesive sizing (this is the glue for the leafing... it has to stay tacky to grab the metal.) * A disposible brush (one you don't mine ruining!) * Some people prefer to wear white cotton gloves to do this so the leafing doesn't stick to your hands, but well, I like to make a mess so I don't mind if I transform into "goldfinger".
Step 1: Prepare your surface I made a little tag to show you this demo, but you can certainly venture to gold leafing right on your page or project. I'll show you some examples at the end. Just shake up the sizing and brush it generously on the areas you want the gold to stick. If you are applying it over a textures surface, you will want multiple coats of the sizing. If you want a more uneven application of gold (creates a more distressed look), then apply a bit less. Step 2: Apply the gold I tear bits of the leafing at a time and apply it to the sticky (slightly dry the area, don't apply while the sizing is wet... it won't stick) areas.
Step 3: Get er' stuck
Use a soft brush or your finger to tap it on and brush off extra. I am not careful or neat about this step!
This is the look that I like... pieces not full coverage.
Step 4: Add on Top I am then ready to add rub ons, embellishments, anything! Here I added a Hambly rub on to the tag. I may add more, but this is for demo purposes! LOL! More examples of finished layouts/ projects using gold leafing on the surface. Now, just leave me a comment below and you could win... a RAK of Prima goodness with a Label Tulip stamp thrown in for good measure! The note set is not a complete set, but only a handful have been used so it's got at least one sheet of each design. There are two kinds of Prima flowers and a brad set. The Label Tulip stamp is one I had and bought a duplicate of just to give away for some lucky girl! So leave some love! I'll pick a winner when I get back from vacation on April 15th. So, you can post a comment until midnight on April 14th! Send your friends here!
I'm off to a weekend scrappy retreat with a bunch of my BFFs.. and then home to pack for Florida and off again for a week with the Family... I'm looking forward to some exciting travel. It's ALWAYS exciting to travel with kids... never boring! LOL! I might need a VACATION from my Vacation! So, no tutorial next week but I will have one on April 16th!
1. I'm revealing my Bad Girls April projects... I loved this kit. It's is full of vintage looking design and fun extras like butterfly Hambly and puffy Thickers! Here's a peek at what the main kit has:You can get it at Bad Girls Kits for this month, but hurry they go fast!!!
Here are my projects for this month using the kit: "Hico, Tx" This is a very vintage picture of my great-grandma and her sister in Hico, Texas. They look so fresh and young here in their dresses and hats. I loved it the minute I saw it in a pile of old pics as my mom was going through old albums. I wanted it! I didn' t know who they were at the time but the photo conjured up all kinds of stories in my mind. I loved distressing the Jenni Bowlin paper with glimmer mist (I used Riptide here) and shipping tags as masks. I then crunched it and inked it. YUM! "1975" This is me! I was 10 months old here and look at all that hair. I always had a ton of dark hair. Don't you just love the fabric on the highchair? So 70's. I loved the Sassafras paper and knew I wanted to cut it up and use it in pieces on kraft paper. I then imitated the red stitching using my sewing machine so that it matched. So fun! "girls" This is a photo of my sister and I in 1979. It's yellowed due to age and being stored in a sticky album. I love the butterfly overlay so much that I had to cut it up and use it on multiple layouts. It had so much color that I layered it over yellows and teal paper. I loved cutting out the birdcages and layering all the girly colors. "Mayflowers basket" This was using the C & T Publishing purse shaped album. I looked at this album so much and tried to invision it as something other than an album. I took the middle pages out and left the covers intact. Added sides, styrofoam, and papers to create a basket. Then I made the flowers out of cut paper circles (maybe I'll do a demo on that later... I got it from somewhere on the net), and added ribbon. Viola! A Spring statement... April Showers bring May flowers! "Broken Record" This is my favorite one... I was inspired by an old ad that Wendy supplied us. It had a picture of a record on it. I had this old 45 and wanted to alter it and add it to the page. I say the same things all day long to my son and knew that I wanted this page to have alot of drama and energy. The colors are bright, the paper is curled and punched using Irene Tan's technique to distress it. I went so far as to punch the record with my Crop-a-dile!
Okay, now run and get that kit and then COME BACK here for a demo/ tutorial on metal leafing! I'll be back to post that and the RAK I'm giving away this week in a bit.


